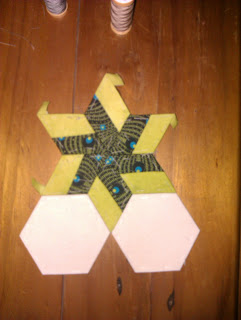
Tube Piecing begins by strip sewing 2 long strips of fabric cut to the same width and length. These fabric strips can be any width, I wanted to use this method to cover my 60-degree star blades, (made from light card templates) so the measurement I needed to cut my fabric is 1½" by the width of the yardage (usually 44 inches).
Two fabric strips are placed right side to right side and sewn with ¼" seam allowance, down both outer edges, (this forms a tube), then using a see-through acrylic Square ruler with a 60-degree angle marked on the ruler grid. The 60-degree angle line on the ruler is placed along the outer edge of the fabric, and then the 60-degree angle is cut on the fabric.
To create the 60-degree triangles I needed to change from the acrylic Square ruler to a see-through acrylic Triangular rule.
This see-through acrylic Triangular ruler is then placed along the outer raw edge of tube fabric, lining up the centre of the acrylic Triangle ruler with the edge of the raw fabric (The sewn ¼" seam allowance should match the ¼" seam allowance on the ruler) and measuring 5" the 60-degree angle line is then cut into the fabric tube.
This cut is repeated along the length of the fabric strip at 5" lengths by moving the acrylic Triangular ruler to the other side of the fabric tube, and repeating the cut. The result is a set of pieced fabrics cut into triangles.
 |
| Using an unpicker to unpick stitches from point of triangle |
now all I have to do is remove the few stitches at the triangle fabric points
 |
| Back of Fabric showing |
 |
| Front of fabric with ends clipped off |
Now
the fun part begins. I really love this part of the process.
.
Using 4
paper clips to secure my light
card template
to my fabric, I first line up the points of the card template with the fabric
seam (the fabric seams have been pressed open to reduce the bulk at the points)
Fold the fabric over the edge of the card template and clip in place with the paper clip
The next step is very important.
I need make sure that the pieced fabric seam to run through the points of my card, these points will later join in the centre of the star when the six star blades are sewn together, to get them to match perfectly I must secure the side directly opposite to the paper clip which is already in place, to do this, fold the fabric over the edge of the card template directly opposite and paper clip and clip it in place using second paper clip. Check that the pieced fabric seam is running through the points.
Continue this process with the other two fabric sides using the third and fourth paper clips to secure the edge of the card template.
Notice the ears at the end of the star blade are pointing in the opposite direction. This is want I wanted to happen to all six star blades because when the star blades are sewn together these ears will nestle together nicely.
I then tack the fabric to the card template making sure that the corners are sharpe points and the seam line is running through the point. Repeat the above process five more times. It takes six star blades form one complete star.
Anne


