Thursday, December 20, 2012

Update on Dylan's Quilt

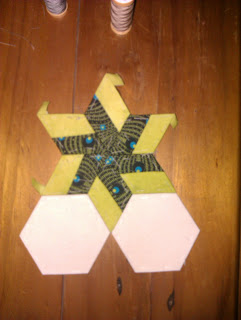
Progress….Yay! After, what feels like a million, zillion hours spent hand sewing tinny diamonds together to form stars and then sewing the two hexies to the stars, I reached my goal of sewing - 2,516 single diamonds and 846 hexagons together to form the star blocks. My plan is to make this quilt revisable, the star blocks have been divided in half. Yes...revisable!!!...I know I am nuts... LOL.

The top needs a total of  203 stars and 423 hexagons.  Same number for the back.

The quilt will be assembled in a two row variation: Making eight strips of Row one and seven strips of Row 2 then sew row 1 and row 2 together alternately 15 times to form the main body of the quilt.

To form Row 1 I joined a star hexagon block to another star hexagon block 13 times ending with a single star at the right hand end of the row. I needed to repeating this row1 x 8 times. (Both ends of Row 1 will end with complete stars).

To form Row 2 I  started by sewing a single diamond to two hexagons then sewing 13 star hexagon blocks together making sure to end the row with a single diamond with two hexagons. (Both ends of Row 2 will have single diamond). I repeated this row 2 x 7 times.

To complete the top and bottom edge of the quilt, a row of single hexagons will be joined by a pairs of diamonds.

Ta da...  It is always a wonderful feeling to finish a quilt top, I do love the challenge of making this quilt reversible. It gives me another opportunity to play with different layout designs... This part of the process has taken some time auditioning the specific fabric placement of the 9 circles. It was easy to lose whole days engrossed with different layout designs.
Front done now for the back.Yay!

Happy sewing until next time
Anne

Wednesday, October 17, 2012

Eye Candy for Quilters

Just a quick post....

These beautiful quilts were created by two very talented quilters, Margaret and Lisa, both are members of the Tuesday Pelican Patchwork and Quilting group.... Thanks, Margaret and Lisa for giving me permission to post these photos of your quilts in blogland for others to enjoy your lovely work.

Lisa's eye-caching, brightly coloured machine embroidered dragon jig saw quilt, appears to be floating on a starry, starry night sky. Terrific layout idea and perfect fabric selection and what fun blocks. This is Lisa's own placement and layout design.

Lisa also made the below "Dancing Batiks" quilt with – paper foundation templates, and pieces of Batik fabrics.  Bradley and Jody Niemeyer designed the layout and foundation pieces for "Dancing Batiks", Lisa has done a terrific job of colour placement. Foundation paper piecing is used when sewing the pieces of Batik fabric onto the foundation units. Paper piecing, curved piecing and traditional piecing skills are required to join each unit after the foundation piecing are completed.
 

Margaret chose to use the paper-piecing method to construct the Star quilt, she used pretty floral scraps of fabric from her scrap collection, (her grandson did the layout design), and paper-piecing ensured the stars had straight edges and accurate joins, especially at the centre of the stars. This was an awesome job of hand-piecing and hand-quilting.

Margaret also made the very pretty Sunbonnet Sue quilt below. Every little girl would love to own and cuddle into one of these cute adorable quilts.

When I first saw these quilt, I thought how awesome they all look! I hope you enjoy them as much as we did at the quilters group. Aren't they beautiful?

Happy quilting until next time

Anne

Wednesday, October 10, 2012

Crayon Fabric Art Quilting.


Today I wanted to share with you my Crayon Fabric Art quilting, I found this process really easy. I used regular wax crayons (Faber-Castell, Crayola, etc.) the kind you buy at the local shops instead of special fabric crayons.


The fabric I chose to use for this small whole cloth project was a white 30/70% poly-cotton blend, I could have used off-white, or pastels but I wanted the lightest colour so I picked white, as I thought a darker colour would have been hard to colour and shade for my first attempt at this process. Before I started it was important too remove all the manufacturing chemical treatment from the fabric, (sizing) by washing the fabric, without adding fabric softener, I did this because if the chemical is not washed out of the fabric, the sizing will act as a barrier and repel the crayons pigments once the wax has evaporated by pressing with a hot dry iron, so I pre-washed and dried the white poly-cotton blend and ironed the fabric to remove all the wrinkles.
Here is the rest of the process

Cut freezer paper to the exact same size as the whole cloth and ironed it to the back side of the background fabric, this stabilized the fabric and made it easy to traces my design using a HB pencil onto the whole cloth.

Now came the fun part colouring the designs with crayons outlining the edges with darker shades of colour to make them stand out. I found the harder you pressed the crayons the darker the colours would be. I applied my crayon colours in one, then two, then three layers. When the coloured area had too much crayon wax I would press the area with a hot dry iron making sure I had paper towel between the top and bottom of the whole cloth and I also covered the top with the Teflon pressing sheet. The hot iron would melt the wax and set the colour pigment into the warm fabric, once the colour pigment was set I could colour the area again, and again adding lots of layers of colour giving me a deeper depth of shades of colour.

When I was happy with my crayon colouring, I peeled off the freezer paper from the back of my fabric and again pressed the whole cloth fabric between two pieces of paper towel, putting one behind and one on top with the Teflon pressing sheet to cover the area to be pressed. This is the secret to soaking up all the melted wax and also keeps the wax from getting on my ironing board and iron.
Using the cotton setting on my iron lift and press for 10 seconds in each area and then move to the next area taking extreme care not to glide my iron over the Teflon Pressing sheet or scorch my fabric....the last step was to repress using paper towels only on the top and bottom this was to removes any oils, which may have been left in the fabric. I then wiped off my iron and Teflon Pressing sheet to remove colour residue which may have been left.  I used Rayon embroider threads and matched the colours of the background colours which gave a soft sheen and variegated threads to add interest.


This Clear View Foot includes inner 1/4" and outer 3/8" marks for even spacing when echo quilting eliminating the need to mark out the fabric beforehand. It also has a convenient slot opening for quilting and zig zag stitching for free motion applique.


I think I will use the gum blossom and bamboo stitches from this practice block and free moton quilt the area. Not sure yet.

Happy quilting until next time

Anne


Sunday, September 30, 2012

Printing Labels on Fabric using your Home Printer

Wow - surprise, surprise you don’t need an expensive printer to print labels on fabric. A while ago I used this technique to print labels on fabric, using a "Brother" Laser Printer and a "Canon" Inkjet printer. Both printers worked for me with no problems.
 
These labels are washable, but the ink on the label may fade in time,  so to stop this from happening I needed to make sure I heat set the ink, I have also embroidered the writing with thread.
 
What you will need
A printer (Laser or Inkjet).
Ink.
100% cotton fabric works best.
Freezer paper to stabilize the fabric (makes the bonded fabric)
An iron and ironing board

Cut a piece of freezer paper to about 9 x 12 inches. Iron waxy side of freezer paper securely to the back of your fabric. This will give you a stiff sheet of fabric that you can feed into your printer. Trim your bonded fabric to an exact 8.5 x 11, make sure there are no loose threads or unsecured edges to catch in your printer, because the fabric is now stabilized with freezer paper, it will roll through the printer without any problem.
 
Carefully feed the bonded fabric into your printer like you would if you were doing a single sheet feed of paper, positioning it so that when it feeds through the printer the label information will print onto the fabric (whether the fabric is right side up or down will depend on how you normally feed your paper into your printer).
 
You can make a simple label using any text programme in Word, centre and type any information you want to appear on the label just enjoy yourself and have fun playing with WordArt, ClipArt, Fonts, etc. Remember to allow space around your label graphics for the ¼" seam allowances.
 
Select paper size Letter 8.5 x 11 then hit print on your computer.
Carefully remove the printed fabric (label) to the ironing board, and peel off the freezer paper, with your hottest dry iron setting, making sure you place a scrap of cloth or extra blank sheets of paper between the ink on the label and the iron and ironing board to catch any wet ink, heat set the ink to the fabric for a few minutes.
 
Soak the label in hot water to check that the ink has been set to the fabric, dry the label on a flat surface and iron it again using starch, turn over the edges approximately ¼" and press, ta da the label is ready to be stitched onto your quilt.
 
WARNING: There is always the potential risk of damage to your printer. While many printers are adjustable for thicknesses of paper, the manufacturers generally do not approve of you putting fabric into them, and you may void your warranty!!!! I give no guarantee that this process will work on your printer but I took the risk and had no problems with my printers
If you do try this remember to make a test sample first.


This label's writing was also appliqued with variegated thread.
Until next time happy quilting.
Anne

Sunday, September 9, 2012

More diamonds for Dylan's quilt

Yes - I've been playing – This time I have  been cutting triangles to make diamonds shapes from the strips of fabric,  still using the same, same - but a little bit different fabric tube piecing technique – I find it fascinating  that I am able to make so many variations of different stars by cutting the fabric tubes differently. These stars are not sewn together yet…. but I think they look great. What do you think?


And Ta Da... I got all these variations from this humble little diamond: - Well...Oppps!  I should say six of them yet to be sewn together.


Until next time happy quilting
Anne

Saturday, August 25, 2012

Paper-Piecing Stars using Tube Pieced Strip of Fabric

Using this method I made both stars below by rearranging the placement of the blades


Tube Piecing begins by strip sewing 2 long strips of fabric cut to the same width and length. These fabric strips can be any width, I wanted to use this method to cover my 60-degree star blades, (made from light card templates) so the measurement I needed to cut my fabric is 1½" by the width of the yardage (usually 44 inches).

Two fabric strips are placed right side to right side and sewn with ¼" seam allowance, down both outer edges, (this forms a tube), then using a see-through acrylic Square ruler with a 60-degree angle marked on the ruler grid. The 60-degree angle line on the ruler is placed along the outer edge of the fabric, and then the 60-degree angle is cut on the fabric.
To create the 60-degree triangles I needed to change from the acrylic Square ruler to a see-through acrylic Triangular rule.
This see-through acrylic Triangular ruler is then placed along the outer raw edge of tube fabric, lining up the centre of the acrylic Triangle ruler with the edge of the raw fabric (The sewn ¼" seam allowance should match the ¼" seam allowance on the ruler) and measuring 5" the 60-degree angle line is then cut into the fabric tube.

This cut is repeated along the length of the fabric strip at 5" lengths by moving the acrylic Triangular ruler to the other side of the fabric tube, and repeating the cut. The result is a set of pieced fabrics cut into triangles.
Using an unpicker to unpick stitches from point of triangle
now all I have to do is remove the few stitches at the triangle fabric points

Back of Fabric showing
Then press the seams open
Front of fabric with ends clipped off
Triming the ends off and viola it’s done.

Now the fun part begins. I really love this part of the process.
.

Using 4 paper clips to secure my light card template to my fabric, I first line up the points of the card template with the fabric seam (the fabric seams have been pressed open to reduce the bulk at the points)

 Fold the fabric over the edge of the card template and clip in place with the paper clip

The next step is very important.
I need make sure that the pieced fabric seam to run through the points of my card, these points will later join in the centre of the star when the six star blades are sewn together, to get them to match perfectly I must secure the side directly opposite to the paper clip which is already in place, to do this, fold the fabric over the edge of the card template directly opposite and paper clip and clip it in place using second paper clip. Check that the pieced fabric seam is running through the points.

Continue this process with the other two fabric sides using the third and fourth paper clips to secure the edge of the card template.
Notice the ears at the end of the star blade are pointing in the opposite direction. This is want I wanted to happen to all six star blades because when the star blades are sewn together these ears will nestle together nicely.
I then tack the fabric to the card template making sure that the corners are sharpe points and the seam line is running through the point. Repeat the above process five more times. It takes six star blades form one complete star.
 
 
Until next time happy quilting
Anne

Saturday, August 18, 2012

WIP - Paper-Piecing Stars


Yippee! I have just finished more stars for Dylan's quilt. I used the Strip sew method to make these stars.

Strip sewing begins with long strips of fabric cut the same width and length. Fabric strips can be any width, but I want my 60 - degree star blades to be 2" the measurement I needed to cut my fabric is 1¼" by the width of the yardage (usually 44 inches). Then the two fabric strips are placed right side to right side and sewn with ¼" seam allowance, the seam
Dark fabric in the middle


is pressed open, a triangular ruler is then placed along the outer edge of the fabric, at a 60-degree angle. The pieced fabric strip is cut along the angle . This cut is repeated along the length of the fabric strip at 2" lengths. The result is a set of pieced fabrics cut in triangles.


Light Fabric in the middle

The Tube strip method was used to make the following stars.  I've gotten a few done!!


love the colour combinations


I will post more stars soon, better get busy and cut more yummy fabric.

Until next time happy quilting
Anne

Wednesday, August 8, 2012

My Janome table has arrived.

At last my Janome Horizon 7700 table has arrived. The table and sewing machine have been on my wish list for the last 12 months, with my constant stream of chatter and hinting my hubby weakened and bought them for me in May this year.


The table has taken forever to get here from the USA via the Eastern States. (The saying we have in Western Australia is true "W.A. stands for wait awhile!!!") lol… the delay was something to do with shipping space in sea containers.

I LOVE my Janome sewing machine. The machine is HUGE, sleek and a beautiful deep red colour. It's not heavy but it is awkward if you wanted to carry it around, I want to create a sewing area with a solid piece of furniture (table) dedicated solely to sewing, as this baby is not going to be packed away in a cupboard or cleared away to make space for another project. 

Guess what I’ll be doing for the rest of the week? Yep! Setting up my sewing room and clearing the clutter by moving things around - there is nothing like a new baby to set up and play with!

Monday, July 30, 2012

Crochet - Gwen's Rainbow Square.

Gwen's Rainbow Square was designed by Gwen Leadbitter

This is a crochet square interwoven with one centre circle (white) then adding four half circles and the last step is to crochet the black square which forms the border.

The squares will be crochet into a rug.

 I still have a long way to go to complete this one. It's a work in progress. It's an easy pattern to follow and the pattern is free to download from Crochet Australia.

Website: www.crochetaustralia.com.au

Saturday, July 21, 2012

Paper-Piecing Stars


A year ago I chose to use the paper-piecing method to construct a quilt for my grandson, Dylan (present for his 18th birthday 2013).  I have given myself another year to finish it -Yes, I know I am nuts LOL.  I chose the paper-piecing method for its convenient mobility. I have been working with one piece at a time, so I am able to pick it up and take it with me wherever I go and bring it out when I have a few spare moments in the evening watching TV or when we are away caravanning and camping.

I cut out and covered 432 cardboard Hexagons shapes with muslin, background fabric. I also cut 2,430 diamonds from cardboard. I chose cardboard not paper because I plan to re-use the cardboard 2 to 3 times more in other projects.
Each star block consists of 6 cardboard diamonds covered by fabric 1/4" larger than the cardboard and 2 hexagons covered by fabric 1/4" larger than the cardboard. I am using three Gutermann's threads Cream, Brown & Grey.  The light Cream thread 829 for the light value fabrics, medium Brown thread 1125 for the medium value fabrics and dark Grey thread 305 for the dark value fabrics.
 
Using whip-stitch I sew 3 diamonds together first, by placing 2 diamonds right sides together and whip-stitched along the edge, just catching the edge of the fabric and missing the cardboard, (as the cardboard will be removed later), then I whip-stitch the 3rd diamond to the others, this makes one halve of the star, then I repeat the process to the remaining 3 diamonds that are left, (second halve of star), then it’s a simple task to whip-stitch the two halves together in one straight line down the centre.
The next step is to whip stitch the 2 covered hexagons to the star (this completes one star block).

  I will need to make a total of 405 Stars blocks.


Once all the Star Blocks have been made I will need to join the star blocks into strips. The 1st rows will consist of 14 star blocks whip-stitched together and 2nd row will consist of 13 star blocks. I will need to repeat this step until all the star blocks are sewn together into strips.

It will be necessary to add a single diamond to both ends of each Row 2 to complete the design.

For the top and bottom of the quilt, a row of single hexagons joined by the pair of diamonds is needed to complete the design. This will form the quilt centre (main body of the quilt). 

Then I will need to cut 4 outside border strips from fabric (not sure what colour yet or how wide these border strips will be cut), but they will need to be cut wider than the finished width, as part of the border will go under the quilt centre.

The plan is to applique, using blind stitch, the quilt centre to these side borders leaving a portion at each corner unstitched to allow me access to join the corners by a mitre, then applique the unstitched section to the border.

It's a great opportunity to use some fabrics from my stash and try out different colour combinations and techniques to make the stars spin.
Until next time happy quilting

Anne


Related Posts Plugin for WordPress, Blogger...